Delivering Cheer

Hello Crafting Hugs Friends! As the seasons turn, it is only appropriate to look ahead to the holiday season. The Delivering Cheer stamp set is perfect for sending cheer to family and friends and for any special deliveries you’d like to make. Mix and match the enchanting line-art images to create a look for any occasion. And, the Delivering Cheer stamp set is perfect for practicing your favorite coloring techniques to customize the images for any season or occasion.

This stamp set is perfect for two-step stamping. The photopolymer (clear) stamps allow perfect alignment to mix and match stamped image to create a delivery girl to match the occasion. Is she wearing a party dress or a winter coat? Add leggings – if you like. Is she delivering a Christmas Tree, a Stack of Gifts or a Big Bouquet? Decide on your favorite coloring technique to add more cheer.

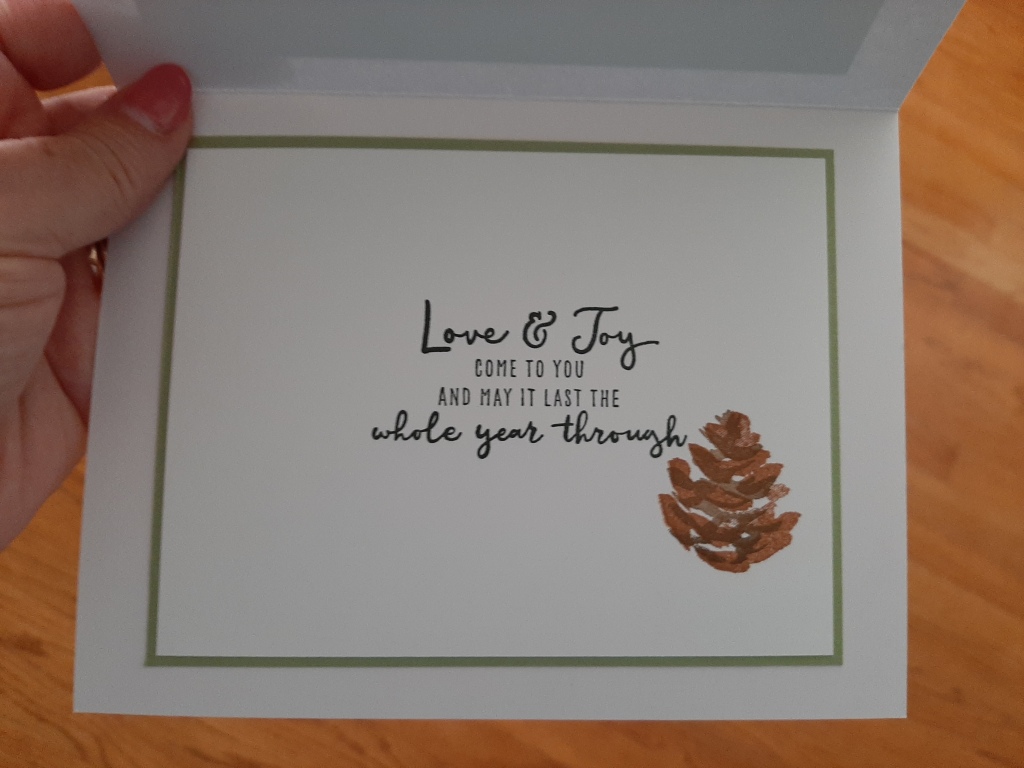
While this stamp set includes holiday sentiments, she could be delivering birthday presents or bouquet of flowers as a thank you or a farewell or get well wishes. Changing up the color combination and the sentiment, and this stamp set will work for any occasion!

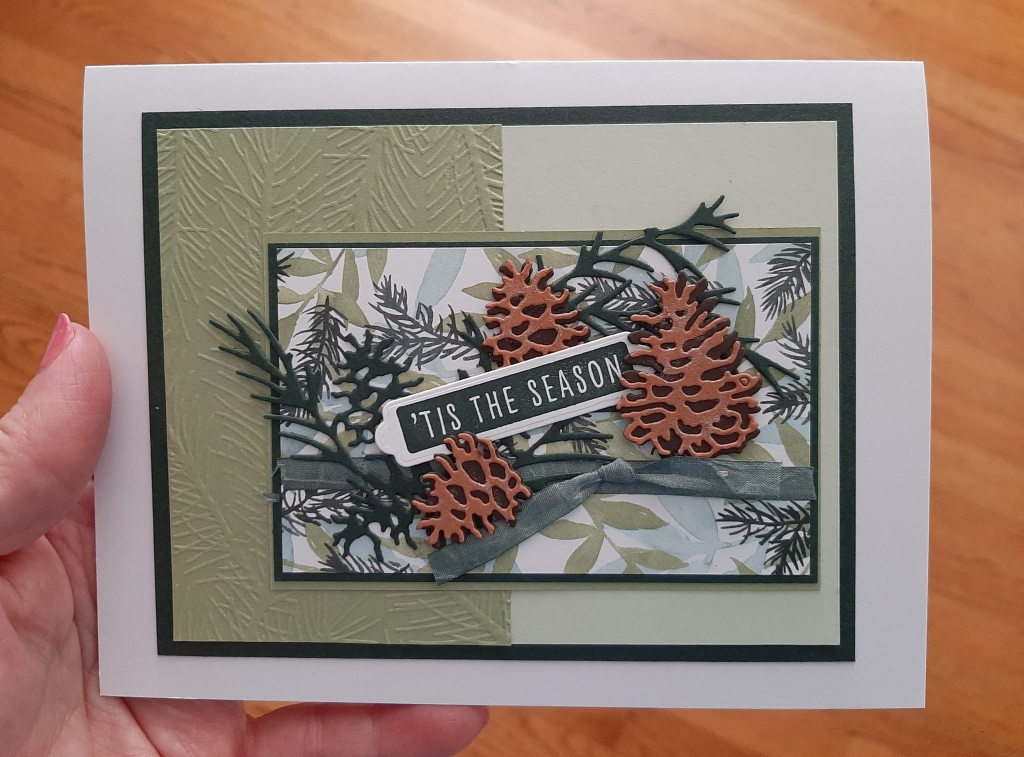
For this card, the girl was stamped on Basic White cardstock using Basic Gray and Real Red classic inkpads. Her jacket, mittens and tree were colored with Stampin’ Blends Alcohol Markers using Basic Gray, Old Olive and Crumb Cake. The stamped image was die cut using Stitched Rectangle Dies and popped up with Stampin’ Dimensionals on a panel of Evening Evergreen Cardstock with a strip of Painted Christmas DSP.

The card front was then double matted with Basic White and Cherry Cobbler cardstock. The sentiment was stamped in Real Red ink on a scrap of Basic White cardstock and Paper Snips were used to create a banner. A piece of Linen Thread was tied into a small bow and attached with a Mini Glue Dot.

Supplies:

If you are interested in Delivery Cheer stamp set or purchasing any of these wonderful products, please click here to visit my online store – or – click on any of the links provided above. And, thank you for supporting my small business.

Until next time, sending you crafting hugs and inspiration wishes!

Lisa

Bouquet from the Daisy Garden

Hello Crafting Hugs Friends! Today’s card features the Daisy Garden stamp set and a few terrific techniques to create one fabulous card that will surely bring a smile to someone!

I just love the beautiful line art of the Daisy Garden stamp set. It is sized perfectly for both cardmaking and scrapbooking projects. Stamp once for an organic bouquet for a card, or stamp multiple times for a repeated background on a scrapbook page. The realistic art style makes this stamp set very versatile for coloring and for many different techniques.

This card was created using five easy techniques: Embossing Resist technique with Color Blending, Bleaching, Splattering and Layering with Mats. These are techniques that you’ll want to use over and over again.

To re-create this card, begin with wiping the card front with a anti-static dryer sheet, then stamp card front using VersaMark ink. Sprinkle white embossing powder over the “wet” stamped image. VersaMark ink takes longer to dry than our classic inks and the stickiness holds the grains of embossing powder. Next, use your Heat Tool to melt the embossing powder to create your embossed card front.

Next, using your Blending Brushes to apply Pale Papaya, Calypso Coral and Old Olive inks to top, middle and bottom of your embossed card front. The embossed image will resist the ink. Use a tissue to wipe away any excess ink.

Next, fill your Water Painter with water and a few drops of bleach. Color within the lines of the embossed image, such as the leaves and the buds. To create a splattering of droplets, tap your Water Painter against a pencil or edge of your bone folder. Tip: You may want to do this tapping outside and wearing old clothes — just in case you get overly zealous with bleach splatters.

Allow the card front to completely air dry – or speed things up using your Heat Tool.

Mat the card front with coordinating cardstock and embellish with Pearl Basic Jewels and ribbon. Tip: Use Stampin’ Blend Alcohol Markers to change the color any ribbon to match your project

Supplies:

Until next time, sending crafting hugs and inspiration wishes!

Lisa

Angel of Peace Thank You Card

Hello Crafting Hugs Friends! Thank you for stopping by. Today’s post features the beautiful line art images of Angels of Peace stamp set and Tidings of Christmas 6×6 designer series paper in the new Holiday Mini catalog (aka July-December 2021 Mini Catalog).

While these products may be offered in the holiday line, this card using Angels of Peace stamp set can be used year round! Yes, perfect for card making all year! And here’s why. The word “angel” has many meanings.

  • It is a Messenger of God (making it a perfect choice for any holiday card).
  • It is a term of endearment like “Daddy’s Little Angel” (making it a perfect choice for a friendship or a thinking of you card).
  • And, it is someone who is has shown you a great kindness and who has been very good to you (making it a perfect choice for a thank you card).

And, if you think this designer series paper is just season, well, you need to take another look at Tidings of Christmas 6×6 DSP. This beautiful paper is double sided – with one side seasonal prints, and the other side all occasion patterns – for twice as many design options.

I created this card for a Stampin’ Up Demonstrator Swap. It has seven layers! It is one of my favorite cards. The angel image was stamped using Soft Suede ink on Very Vanilla cardstock. I used my Stampin’ Blends Crumb Cake marker to color her hair and the little bird in her hand.

Next, I used my Stampin’ Blends Crumb Cake marker to add color, highlights and shadows by following the lines of the stamped image. The stamped image was punched using a 2.25″ circle punch (retired) and matted with a piece of Cherry Cobbler cardstock punched using a 2.5″ circle punch (retired). The sentiment piece of Very Vanilla was pulled from my scraps.

Tip: Easiest way to create a notched banner. Start with making a small snip up the middle and lengthwise. This first snip is important because it will minimize the potential for a lopsided banner. To complete your banner, snip from one corner to the top of that first snip up the middle. Then repeated on the opposite corner to the top of that first snip. Creates the perfect banner every time. Keep in mind that the deeper the cut up the middle, the more prominent the banner will be. Typically, the small snip up the middle is usually 1/2 the width. I think that’s the easiest and most repeatable.

Supplies:

Please leave me a comment about the Angels in your life and who may benefit from such a card. If you are interested in purchasing any of these crafting supplies, please use the links provided – or- visit my on-line store. Thank you for visiting my blog and for supporting my small business. Your friendship means a lot to me!

Until next time, sending you crafting hugs and inspiration wishes!

Lisa

Christmas to Remember

Hello Crafting Hugs Friends! If you want to be holly, jolly ol’ elf making Christmas cards, then you’ll love the Christmas to Remember Bundle – with Christmas to Remember stamp set and Christmas Pinecone Dies. This sentiment-only holiday stamp set with nine heartfelt sentiments with a hand-lettered style that speaks right from your heart. And, the Christmas Pinecone dies layer together for realistic 3D effect and are best assembled using Adhesive Sheets. Friends and family will be ooh-ing and aah-ing over your handmade creations. And, this is why. Just look at this beautiful card.

I just love the texture and dimension of these pinecones. Pinecones and sentiment are popped up with dimensions with a greenery die cut in Evening Evergreen underneath. This is lays on top of Painted Christmas DSP to create a greater illusion of depth. This card front is double matted with more cardstock, then embossed cardstock using Wintry 3D Embossing Folder and more cardstock and another mat.

Here’s a close up. I just love how these Christmas Pinecone Dies are layered on top of each other, tucked in and then nestle together. A touch of Wink of Stella Glitter Brush adds some shine and is reminiscent of early morning frost. As for the ribbon embellishment, it is the White 1/4″ Crinkled Seam Binding Ribbon colored using an Evening Evergreen Stampin’ Blends Alcohol Marker. The sentiment is stamped in Evening Evergreen ink and die cut using Seasonal Labels Dies.

Tip: You can color any ribbon, trinket, gem, pearl, rhinestone, etc. to perfectly match your project using Stampin’ Blends Alcohol Markers.

And, here is a peek at the inside of the card. The sentiment is stamped in Evening Evergreen ink, and the pinecone from a complementary stamp set, called Christmas Season stamp set is two-step stamped using Soft Suede and Cinnamon Cider inks.

Yes, this stunning card is made with two complementary bundles as part of the Painted Christmas Suite Collection. This elegant suite collection includes all the coordinated products you need to do Christmas crafting like a pro using traditional colors and an elegant style. The Painted Christmas Suite Collection saves you money and includes:

Supplies:

Until next time, sending you crafting hugs and inspiration wishes!

Lisa

Scrapping With Celebrate Sunflowers

Hello Crafting Hugs Friends! I am as passionate about scrapbooking as I am about stamping. And, I love that I can stamp on my scrapbook pages using Stampin’ Up products. I know that everything will coordinate — cardstock, designer series paper, inks and embellishments — and that everything is lignin-free, color-fast and archival quality. One thing I enjoy doing is pre-making my scrapbook pages; so that when I do sit down to scrapbook, I can make a bunch of pages fast!

For quite some time, I have enjoyed creating cards using the stunning images and die cuts from the Celebrate Sunflowers stamp set and Sunflower Dies. And, it was refreshing and so much fun to create this two-page scrapbook layout using the custom die-cut sunflowers elements and accents using the Sunflowers Dies that pair perfectly with the Celebrate Sunflowers Stamp Set.

This any occasion 2-page layout uses the winning color combination of: Bumblebee, Daffodil Delight, Granny Apple Green, Old Olive, Misty Moonlight, Pumpkin Pie, Rich Razzleberry, Basic White, Crumbcake, Soft Suede and Early Espresso.

I created my own designer series paper using 12×12 Bumblebee cardstock with tone-on-tone stamping using small sunflower, dragonflies and square tile images from Celebrate Sunflowers, Dragonfly Garden and Tasteful Touches stamp sets.

TIPS AND TRICKS: Randomly stamp images, while rotating your stamp one way and then another. Start stamping with your largest stamped image, then fill in the empty spaces with smaller stamped images. Continue stamping until all the empty spaces are filled.

This two-page spread was so fun to create.

I just grabbed some scraps of cardstock and my Stampin’ Up Cut & Emboss Machine and created a pile of diecuts…..then I started to create. In the end, I added a single white daisy for a little brightness.

TIPS AND TRICKS: Having many different types of adhesives to choose from makes the design process easier for creating wonderful projects! Some adhesives are easier to use in certain situations. For example, Mini Glue Dots provide you with instant dots of adhesive. No fumes, no mess, no drying timework better. And, easy to tuck underneath die cuts for added security. Some adhesives have added benefits. Stampin’ Dimensionals, Mini Stampin’ Dimensionals and Black Stampin Dimensionals are double-sided adhesive foam dots that work great for attaching heavier embellishments, but also add depth and dimension for a 3-D effect to your project.

Supplies Used to create this scrapbook layout:

Please leave me a comment to let me know what you like about this scrapbook layout. And, please share ideas for using your stash of Stampin’ Up products in your scrapbooks.

If you are interested in learning more about scrapbooking with Stampin’ Up products, please private message me and follow my blog for more inspiration.

If you are interested in purchasing any of the featured products, please click here to visit my online store or click on any of the links above.

Until next time, sending you crafting hugs and inspiration wishes for using your Stampin’ Up supplies to create unique scrapbook pages!

Lisa

Pretty Pumpkins

Hello Crafting Hugs Friends! If you love pumpkins and everything fall, then you’ll want the Pretty Pumpkin Bundle, that includes Pretty Pumpkin Stamp Set and Detailed Pumpkin Dies.

The Pretty Pumpkin stamp set features pumpkins, vines, and leaves images that are designed to be stamped and layered. For more design fun, the vines are mirror images so you can stamp a long or short line of pumpkins and bookend them with the vines. The beautiful line art means that this stamp set is great for practicing your favorite coloring techniques. And, I just love the sentiments – perfect for friendship and gratitude cards.

The Detailed Pumpkin dies include solid pumpkins as well as textured and intricate pumpkins, that can be used individually or layer together for tone-on-tone elegant gourds. After a quick pass through your Stampin’ Cut & Emboss Machine, these beautiful dies are a wonderful addition to any project.

This card has lots of texture – from its embossed layer, to its intricate die frame, and finally with its cork pumpkin with a tied ribbon. And, that cute pumpkin is popped up with Mini Stampin’ Dimensions for added interest and dimension. Plus that shiny black sentiment with scripty lettering is just fabulous!

Supplies for creating this card:

Until next time, sending you crafting hugs and inspiration wishes!

Lisa

Hello Friend Technique Card

Hello Crafting Hugs Friends! The other day, I needed to send a friendship card. Just something quick and simple. I chose the masking technique — where post-it tape or post-it notes are used to protect the card front — while blending and stamping to decorate the “exposed” area to create my own designer paper.

For this project, I used:

Step-by-Step Instructions with Photos

Mask off area.

Using blending brushes to add Bermuda Bay and Granny Apple Green. Remember to tap-off the fresh ink in order to minimize the potential for brush strokes.

Using first and second generation stamping, stamp seashell images. If you wish to splat some Wink of Stella, then do so before removing the Post-it Tape mask.

Gently remove masking.

And, for the fun part, decorate the card front. Here, I stamped a greeting, framed the mask area with satin and sheer ribbons, then double matted the card front. I cut the Metallic Mesh Ribbon in half lengthwise, layering one piece on top of the other, slipped it under the satin and sheer ribbons and tied a square knot. This allowed me to gently pull the two pieces of Metallic Mesh Ribbon apart to create a fuller bow. A few clear rhinestones and

Why Every Crafter Needs Post-it Notes in their craft room?

Every crafter needs post-it notes in their craft room. They are inexpensive and can be purchased anywhere. They come in multiple sizes that are perfect for jotting down a reminder to reorder craft supplies or to make a quick project sketch. They are great for mini-to-do list of number and types of greeting cards you need to make and to send out this month. They are perfect to book marking wish list items or creating index tabs for your catalog. They make wonderful labels when reorganizing your craft room. The low-tack, pressure-sensitive adhesive allows those helpful little Post-it notes to be easily attached and removed without leaving any residue. When you need to die cut a stamped image, post it notes are perfect for holding die cuts in place. And, Post-its are very handy to have for different masking techniques.

Please leave a comment and share how you use Post-it Notes and Post-it Tape in your craft room.

Until next time, sending you crafting hugs and inspiration wishes!

Lisa

Many Ways to Use Designer Paper

Hello Crafting Hugs Friends.

We love gorgeous Designer Series Paper! And, we love it more when it’s on sale! Now through August 2nd you can get a 15% discount on nine select Designer Series Paper from the 2021–2022 Annual Catalog!

One of the easiest ways to make a quick card is to use Designer Series Paper. This pretty paper does all the design work for you. Stampin’ Up!’s Designer Series Paper comes in a variety of colors and patterns making it a snap to find inspiration to create a card for any occasion.

Designer Series Paper is my go-to when I need inspiration on color combinations. It is also the perfect starting point, or finishing touch, when you want to create quick and simple cards. It adds that little extra detail on an over-the-top card and provides special accents for scrapbooking and memory keeping.

Here are just a few creative ways for using Our Gorgeous Designer Series Paper :

  • Create a sweet and quick card by simply matting some designer paper, adding a sentiment and a few embellishments and you have a winning design for any occasion.
  • Fussy cut elements from the pattern paper to embellish your card front.
  • Use Blending Brushes, Daubers or Sponges to accentuate the edges and to enhance (or change) the color scheme.
  • Use Stampin’ Blends or Watercolor Pencils to color the pattern paper to add depth and to enhance your design.
  • Emboss the pattern paper for more texture and dimension
  • Add colorful strips or blocks of pattern paper to make a fun background
  • Layer pattern paper for more color and interest. If the pattern is too bold, add a layer of translucent vellum to soften the color.
  • Find inspiration for great color combinations. Every pack of designer series paper lists the Stampin’ Up colors used in creating it — so that you can mix and match colors with confidence.
  • Add interest on the inside of your card with a thin strip of pattern paper
  • Make gift bags, gift boxes and other 3D projects
  • Decorate a journal, memo pad or tin
  • Need a lot of cards at one time, mass produce a bunch of cards by creatively cutting your pattern paper using any one of One Sheet Wonder templates to creatively cut your pattern paper.
  • Scrapbook with it to make beautiful background pages and borders. You can even fussy cut out images to use as embellishments. I use patterned paper for titles, matting, tags, borders/accent squares and paper piecing

  • Beauty of the Earth (part of a suite collection) — with beautiful forest-themed images
  • using lovely colors of Bumblebee, Cajun Craze, Cinnamon Cider, Early Espresso, Merry Merlot, Misty Moonlight, Night of Navy, Mossy Meadow, and Old Olive

  • Bloom Where You’re Planted (part of a suite collection) — with lush images of potted plants and cascading greenery using Cajun Craze, Cinnamon Cider, Evening Evergreen, Garden Green, Gray Granite, and Just Jade
  • Hand-Penned (part of a suite collection) — with delicate floral designs and neutral simple patterns using lovely pastels in Blushing Bride, Cinnamon Cider, Daffodil Delight, Garden Green, Highland Heather, Mint Macaron, Misty Moonlight, Pale Papaya, and Pool Party
  • In Good Taste (fan favorite, carry-over from last year’s catalog) — with photographic images of wood, tile, stone, and other elements that provide beautiful layers and rich textures to any project using Basic Gray, Early Espresso, Gray Granite, Night of Navy, Petal Pink, Rococo Rose, Smoky Slate, and Very Vanilla
  • In the Wild (part of a suite collection) — with images of big cats to jungle foliage, this paper pack will drive you wild with creativity using Basic Black, Cajun Craze, Crushed Curry, Evening Evergreen, Merry Merlot, and Soft Succulent
  • Pansy Petals (part of a suite collection) — with elegant floral patterns using Blackberry Bliss, Bumblebee, Calypso Coral, Evening Evergreen, Fresh Freesia, Pale Papaya, Polished Pink, Soft Sea Foam, and Soft Succulent
  • Sweet Symmetry (part of a suite collection) — with traditional, symmetrical folk art images and florals in soft colors of Bumblebee, Calypso Coral, Flirty Flamingo, Just Jade, and Night of Navy
  • Tidings of Christmas (part of a suite collection) — with seasonal designs on one side and all-occasion basic designs on the other using Cherry Cobbler, Evening Evergreen, Misty Moonlight, Sahara Sand, and Soft Succulent
  • You’re a Peach (part of a suite collection) — with images of peaches, flowers and some peachy keen basic geometric designs using Balmy Blue, Bumblebee, Calypso Coral, Early Espresso, Mango Melody, Pale Papaya, Pear Pizzazz, and Petal Pink
  • If you are interested in any or all of these Designer Series Paper Packs, simply click here, or on the links provided, to visit my on-line store.

    Until next time, sending you crafting hugs and inspiration wishes for using gorgeous Designer Series Paper in your paper crafting projects

    Lisa

    Introducing a Peachy Keen Collection

    Hello Crafting Hugs Friends! Thank you for stopping by today!

    Everything’s just peachy when you craft with this You’re a Peach Suite Collection. The all-occasion collection is ideal for making greeting cards, scrapbooking and gift packaging.

    The You’re a Peach Suite Collection includes:

    • Sweet As a Peach Photopolymer Stamp Set (10% off) — Everything is peachy when you craft with this clear stamp set. Build your own images by stamping the peaches, flowers, and foliage individually and layering color. The images are perfect for watercoloring. Then add a sentiment that expresses your feelings: thanks, happy birthday, celebrate, and more for perfect handmade cards.
    • Peach Dies (10% off) — Create your own peach orchard with the Peach Dies! Mix and match the die cuts to make branches, layering foliage, flowers and fruit, in bright and beautiful colors.
    • You’re a Peach Designer Series Paper — double-sided, high-quality 12×12 paper provides you with twice the design options and twice the inspiration. This paper is peachy keen, with images of peaches and flowers and some basic geometric designs. Perfect for scrapbooking, card making, gift wrap, and more. Now through August 2nd, receive 15% discount off this gorgeous paper.
    • Mini Jam Jars — these adorable plastic jars are food-safe and perfect for packaging sweet treats and goodies
    • Coordinating colors: Product colors: Balmy Blue, Bumblebee, Calypso Coral, Early Espresso, Mango Melody, Pale Papaya, Pear Pizzazz, Petal Pink, Whisper White
    • Simply add ink, cardstock, and adhesive to complete your projects.

    Crafting is peachy keen when you use this You’re a Peach Suite Collection. I can honestly say that I have been wanting this collection from Day One. And, these adorable mini jam jars are just adorable. They make the cutest little summer gift!

    If you are interested in purchasing these items — as a collection or individually, please click on the links provided above.

    Until next time, sending you crafting hugs and inspiration wishes for peachy keen creations!

    Lisa

    Card Making Using Dies

    Hello Crafting Hugs Friends! Welcome! Thank you for stopping by!

    Here is a card that I received from another Stampin’ UP Demonstrator and Friend, Michelle Brown, who created this darling forest scene using the Iconic Dies and Basic Border Dies. Can you image the little creatures that live there? Maybe a fairy or gnome? Or tiny turtle?

    It is so easy to create your own fairytale forest scene with the Iconic Dies! These dies are very versatile can be combined with other stamped images and die cuts to make one-of-a-kind scene. Try layering the die cuts in natural tones and other stamped images, and you’ll have a masterpiece! There are so many options with these Iconic Dies!

    Dies help you create unique die-cut shapes and paper cut outs with just a quick run through your Stampin’ Cut & Emboss Machine. And, die cuts can easily be colored with a few swipes of Blending Brushes for a natural color look.

    If you are interested in any of these products, simply click on the links provided or click here to visit my online store.

    Until next time, sending you crafting hugs and inspiration wishes for creating your own fairytale masterpieces.

    Lisa