Delivering Cheer

Hello Crafting Hugs Friends! As the seasons turn, it is only appropriate to look ahead to the holiday season. The Delivering Cheer stamp set is perfect for sending cheer to family and friends and for any special deliveries you’d like to make. Mix and match the enchanting line-art images to create a look for any occasion. And, the Delivering Cheer stamp set is perfect for practicing your favorite coloring techniques to customize the images for any season or occasion.

This stamp set is perfect for two-step stamping. The photopolymer (clear) stamps allow perfect alignment to mix and match stamped image to create a delivery girl to match the occasion. Is she wearing a party dress or a winter coat? Add leggings – if you like. Is she delivering a Christmas Tree, a Stack of Gifts or a Big Bouquet? Decide on your favorite coloring technique to add more cheer.

While this stamp set includes holiday sentiments, she could be delivering birthday presents or bouquet of flowers as a thank you or a farewell or get well wishes. Changing up the color combination and the sentiment, and this stamp set will work for any occasion!

For this card, the girl was stamped on Basic White cardstock using Basic Gray and Real Red classic inkpads. Her jacket, mittens and tree were colored with Stampin’ Blends Alcohol Markers using Basic Gray, Old Olive and Crumb Cake. The stamped image was die cut using Stitched Rectangle Dies and popped up with Stampin’ Dimensionals on a panel of Evening Evergreen Cardstock with a strip of Painted Christmas DSP.

The card front was then double matted with Basic White and Cherry Cobbler cardstock. The sentiment was stamped in Real Red ink on a scrap of Basic White cardstock and Paper Snips were used to create a banner. A piece of Linen Thread was tied into a small bow and attached with a Mini Glue Dot.

Supplies:

If you are interested in Delivery Cheer stamp set or purchasing any of these wonderful products, please click here to visit my online store – or – click on any of the links provided above. And, thank you for supporting my small business.

Until next time, sending you crafting hugs and inspiration wishes!

Lisa

Angel of Peace Thank You Card

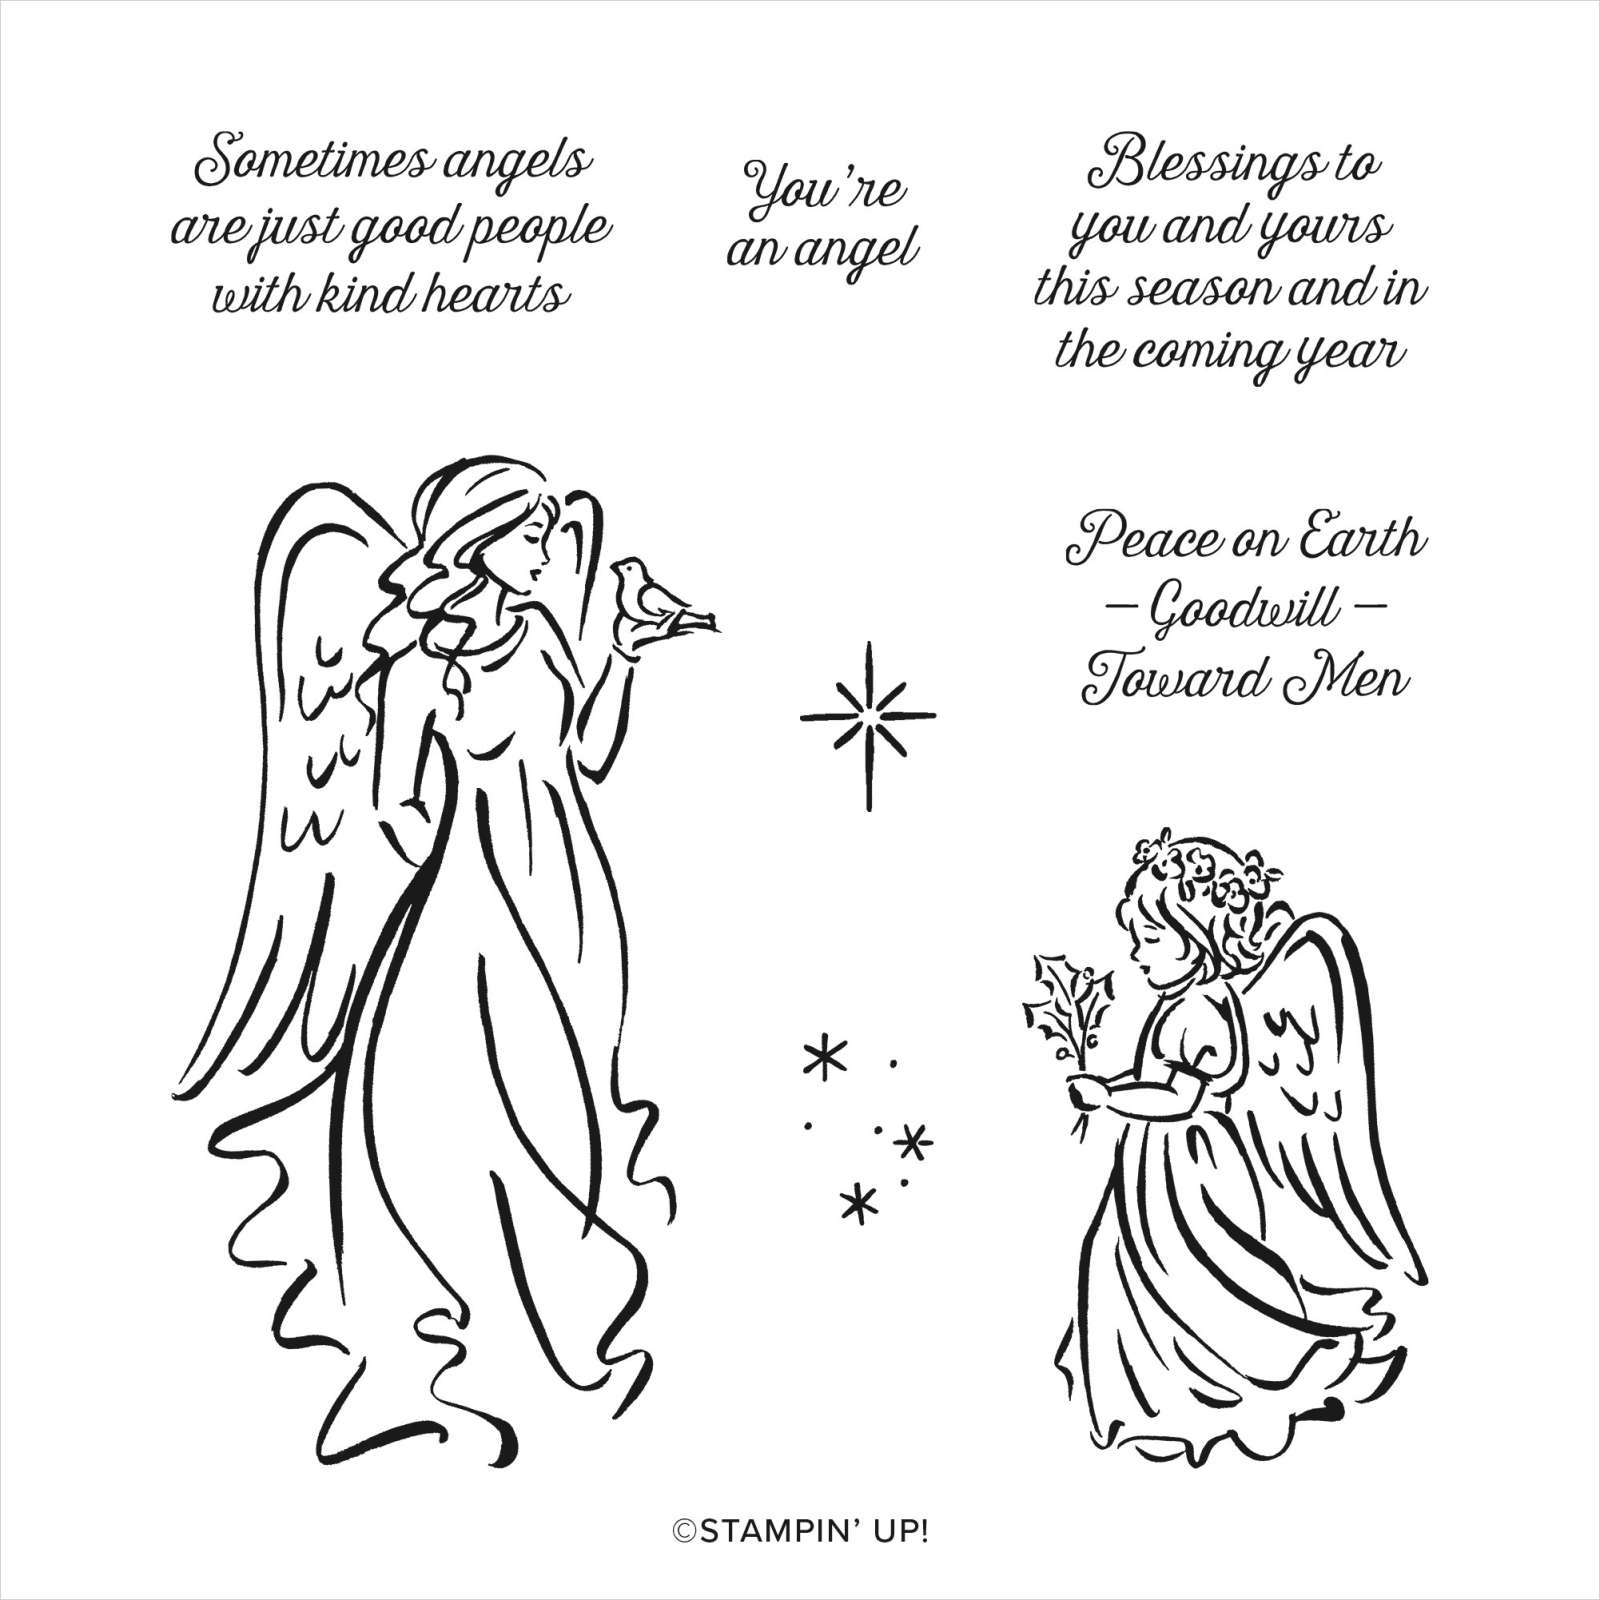
Hello Crafting Hugs Friends! Thank you for stopping by. Today’s post features the beautiful line art images of Angels of Peace stamp set and Tidings of Christmas 6×6 designer series paper in the new Holiday Mini catalog (aka July-December 2021 Mini Catalog).

While these products may be offered in the holiday line, this card using Angels of Peace stamp set can be used year round! Yes, perfect for card making all year! And here’s why. The word “angel” has many meanings.

  • It is a Messenger of God (making it a perfect choice for any holiday card).
  • It is a term of endearment like “Daddy’s Little Angel” (making it a perfect choice for a friendship or a thinking of you card).
  • And, it is someone who is has shown you a great kindness and who has been very good to you (making it a perfect choice for a thank you card).

And, if you think this designer series paper is just season, well, you need to take another look at Tidings of Christmas 6×6 DSP. This beautiful paper is double sided – with one side seasonal prints, and the other side all occasion patterns – for twice as many design options.

I created this card for a Stampin’ Up Demonstrator Swap. It has seven layers! It is one of my favorite cards. The angel image was stamped using Soft Suede ink on Very Vanilla cardstock. I used my Stampin’ Blends Crumb Cake marker to color her hair and the little bird in her hand.

Next, I used my Stampin’ Blends Crumb Cake marker to add color, highlights and shadows by following the lines of the stamped image. The stamped image was punched using a 2.25″ circle punch (retired) and matted with a piece of Cherry Cobbler cardstock punched using a 2.5″ circle punch (retired). The sentiment piece of Very Vanilla was pulled from my scraps.

Tip: Easiest way to create a notched banner. Start with making a small snip up the middle and lengthwise. This first snip is important because it will minimize the potential for a lopsided banner. To complete your banner, snip from one corner to the top of that first snip up the middle. Then repeated on the opposite corner to the top of that first snip. Creates the perfect banner every time. Keep in mind that the deeper the cut up the middle, the more prominent the banner will be. Typically, the small snip up the middle is usually 1/2 the width. I think that’s the easiest and most repeatable.

Supplies:

Please leave me a comment about the Angels in your life and who may benefit from such a card. If you are interested in purchasing any of these crafting supplies, please use the links provided – or- visit my on-line store. Thank you for visiting my blog and for supporting my small business. Your friendship means a lot to me!

Until next time, sending you crafting hugs and inspiration wishes!

Lisa

Festive Foliage

Hello Crafting Hugs Friends! Today, I am going to share with you a gorgeous background stamp called the Festive Foliage Stamp Set. The open line art of the stamps is perfect for practicing your favorite coloring techniques, such as water coloring, color blending, and more! This background stamp is very versatile – the greenery image is perfect for any season or any occasion.

The card front was masked with post-it notes, in order to get sharp crisp lines during color blending. Several Blending Brushes were used to apply Cherry Cobbler, Olive Green and Soft Succulent inks randomly. While the post-it note mask was still in place, I added a few splatters from a Wink of Stella Glitter Brush. After allowing the piece to dry, the background image was stamped using Evening Evergreen ink and the Stamparatus.

I just love how easy the Stamparatus makes creating beautiful things. A must-have tool for all stampers because the Stamparatus is fool-proof. It helps you to perfectly align stamp images, to stamp multiples of the same project quickly and precisely, and to get complete ink coverage when the stamped image is incomplete or too light. It is perfect to use with this large background stamp to get complete ink coverage and crisp lines.

The card front was embossed using Tasteful Textures 3D Embossing Folder. The sentiment from Perfectly Plaid stamp set was stamped, punched with Everyday Label Punch and popped up with Stampin’ Dimensionals. And lastly, the card front was matted with Cherry Cobbler cardstock to make it more festive.

Supplies:

Until next time, sending you crafting hugs and inspiration wishes!

Lisa
Let’s Celebrate You

Hello Crafting Hugs Friends! Today, we are celebrating friendship! While this could be a card for any occasion, today it is about friendship and how much I appreciate each and every one of you!

To create this beautiful card, you will need solid sheet of Basic White cardstock and your favorite blending tool. With its smooth surface, it is easy to blend colors together with a few couple swirls using either our Blending Brushes, Sponge Daubers or a few make up sponge. I just love our new Blending Brushes. It is so easy to color and blend with these brushes.

Tip: After inking, remember to “tap off” the ink on scrap piece of paper. This will minimize the potential for swirl lines as you apply the color

To create this card, apply color using your favorite blending tool on a piece of Basic White cardstock using uses Gorgeous Grape, Highland Heather, Bermuda Bay, Coastal Cabana, Soft Sea Foam and Granny Apple Green. Once you have the many different color, allow to air dry, then die cut using the Brilliant Wings Dies. Select your favorite butterflies and bend the wings upward to add dimension and movement to the card.

To create the card front, stamp the words “LET’S”, “Celebrate” and “You” from the Create with Friends stamp set in Granny Apple Green ink. This is an essential stamp set to celebrate your close cardmaking friends! Elegant font and different word pairings makes it a very versatile stamp set useful for any occasion. Use the speckled stamp image from Quiet Meadow stamp set to add some color to the background piece.

Tip: Many stamp sets include speckled stamped images. Alternatives to Quiet Meadow include Painted Poppy and Friends are Like Seashells have smaller speckled stamp to use. Triple mat with Highland Heather, Basic White and Just Jade cardstock.

Using Multipurpose Liquid Glue, apply a thin strip of glue to the body of the butterfly and attach to the card front. Embellish with a few Rhinestone Basic Jewels. And you have a colorful card ready to celebrate friendship anytime and for any occasion!

Thank you so much for your wonderful friendship. I hope that we can get together and craft soon!

Please leave a comment and let me know what you’re creating with your Stampin’ Up products.

Until next time, sending you crafting hugs and inspiration wishes for celebrating friends!

Lisa

Reflected in Nature

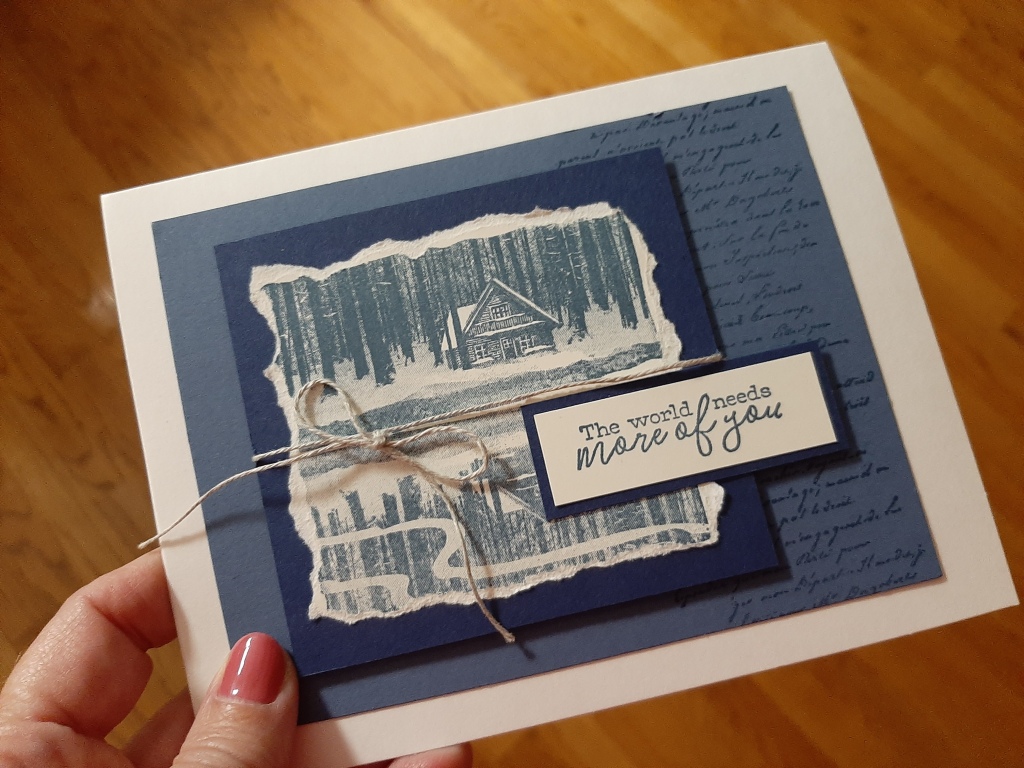
Hello Crafting Hugs Friends! Today, I have a new stamp set to share with you called Reflected in Nature. This stamp set is my number one pick from the new Mini Holiday Catalog (aka July – December 2021 Mini Catalog).

Reflected in Nature stamp set gives you that cozy cabin in the woods with a reflection in the calm lake. Here are the many reasons why I love the Reflected in Nature stamp set:

  • It evokes feelings of calm, serenity, stillness, peace and quiet. And, the sentiments help you capture that feeling with the simplicity of lower case and block lettering.
  • The cabin image is large enough to be the focal point on a card front—stamp once and you’re done! Finish your card with a stamped sentiment and minimal embellishments.
  • It works for any occasion, in any season. Simply choose a sentiment that fits the reason for giving the card. I think this would be great stamp set for creating a congratulations card, a retirement card, a farewell card to send a friend off with best wishes on a new adventure, and also as an encouragement card to wish someone peace and calm at a difficult time in their life. And, a cabin in the woods can be colored to reflect any season.
  • It is appropriate for any masculine cards. Let’s face it most of our stamps are feminine. So, I always recommend purchasing masculine stamp sets. And, this stamp set does double duty because it also works for any occasion, masculine or feminine.
  • It is a Distinktive stamp set. I love that stamped photo-realistic image. It is unique in that the stamp surface has a special texture that gives the image added depth and dimension. And, to be honest here, I believe that I own just about every Distinktive stamp set that Stampin’ Up has made.

I created this card to swap with other demonstrators. I experimented with different blues and combinations of blues (for cabin and for the reflection) which were okay. But in my opinion, Misty Moonlight worked the best. I stamped the image on Very Vanilla cardstock and then tore the cardstock along the edge of the stamped image. The stamped piece is attached to Night of Navy cardstock and tied with Linen Thread.

Torn Edge technique has been around for a long time. It works best when the cardstock or pattern paper is torn towards you. To control where the the torn edge is created, tear in short increments – about an half inch at a time.

The background piece is stamped using the handwritten script image from Very Versailles stamp set. The sentiment from Free as a Bird stamp set is stamped in Misty Moonlight ink. The matted stamped image and the matted sentiment are popped up with Stampin’ Dimensionals.

If you do not have a Stampin’ Up demonstrator, I will happily send you a catalog and assist you in your creative endeavors.

If you are interested in purchasing this stamp set, simply click here to visit my online store or click on any of the links provided above.

Until next time, sending you crafting hugs and inspiration wishes!

Lisa

A Gift of Prized Peony Note Pad

Hello Crafting Hugs Friends! Welcome!

Today’s blog post is about how to make another lovely gift, with no strings attached, to give to someone special. I actually received this notepad as a gift from a dear friend and I wanted to share how to make it with you. It looks so lovely on my desk and is a gentle reminder of our friendship.

Hopefully, these instruction will help you make a notepad in any color, using any stamp set. This project features the graceful images and sentiment from the Prized Peony Stamp Set.

And, it is a great way to use your craft stash of beautiful designer series paper and cardstock, especially if it has retired.

First, you need to purchase a notepad — maybe at the Dollar Store, Walmart, Office Max, etc. This particular note pad measures 5″x8″ and it is about 3/8″ thick. More than likely, you may need to adjust the measurements to fit your notepad. If it has a top binding, that covers the “glued top” of the note pad, then you may wish to cover it so that it coordinates with the overall design of your project.

To cover the top binding, you need 5″x2 piece of DSP. Use Multipurpose Liquid Glue – or – Stampin’ Seal Plus to attach this piece to cover the top binding, folding over the thickness, and attaching to the back cardboard cover of the note pad. Designer Tip: Using Blending Brushes and ink to add color to neutral or black & white prints.

To create the note pad’s cover, you will need to measure the length, width and thickness of your note pad. This one is 8″ long, 5″ wide and less than 1/4″ thick. For the back, side and front cover, we need 5″ + 1/4″ + 5″ = 10-1/4 inches (or 10.25″). So we need a piece of cardstock that is 8″ tall x10-1/4″ wide. Using your Simply Scored Scoring Tool, score at 5″ and 5-1/4″; then, burnish the score lines using a Bone Folder.

Now attach the burnished cover on the backside cardboard of the note pad using Multipurpose Liquid Glue. I prefer placing the glue on the back cover, then centering the notepad on top of the cover and sliding it into place. Wet glue give you a little extra time to align note pad inside the burnished cover before the glue creates a permanent bond.

To decorate the front cover, use a piece of 5×6 DSP, a piece of 5×4-1/4 embossed Basic Gray cardstock and 7″ piece of ribbon. Attach embossed piece to the DSP using Multipurpose Liquid Glue. Decorate with ribbon, attaching ends securely with Stampin’ Seal Plus on the backside. Now attach this assembly to the front cover of the note pad.

Pop up the matted stamped image and sentiment with Stampin’ Dimensionals, add a few Rhinestone Basic Jewels, and create a wonderful gift to brighten someone’s day.

Supplies Needed:

Do you enjoy creating and giving little gifts? I love to delight my girlfriends with little homemade gifts. My girlfriends love receiving those special little gifts and knowing that I made something just for them with absolutely no strings attached.

Please leave me a comment and photo of something that you made special for gift giving.

Until next time, sending crafting hugs and inspiration wishes!

Lisa

Sweet Strawberry Birthday Card

Hello Crafting Friends!

If you need a sweet birthday card, then look no further than Sweet Strawberry Bundle. I just love anything strawberry and this stamp set has such sweet all-occasion sentiments. This is a bundle that I have found myself reaching for again, and again for cards, scrapbook pages and 3D projects. And, the punch lets me quickly cut out stamped images and build a plump strawberry with one punch.

This card is really simple stamping — just paper, ink and stamping — made easier with a punch. However, if you wish, your paper snips will make it very easy for you to fussy cut the strawberries, flower and the green cap images.

To create this card front, use a Blending Brush and Daffodil Delight ink pad to color the center of the Basic White cardstock piece. Using Memento Tuxedo Black ink, stamp the sentiment in the lower left corner and then stamp the strawberry vine twice. Color the stamped vine using Stampin’ Blends Alcohol Markers.

When coloring the leaves, I like to start with Daffodil Delight and color the whole image, then coloring with Light Granny Apple Green, allowing some of the yellow to peek through. Next, I add some Dark Granny Apple Green and blend out with the Light Granny Apple Green.

For coloring the flowers with my Stampin’ Blends Alcohol Markers, I used the wide brush end to color using Daffodil Delight and the fine-tip end of Pumpkin Pie to add a few lines.

The green caps are attached to the strawberries using Mini Glue Dots. The strawberries and flower are attached with Mini Stampin’ Dimensionals. Note: “double stack” the dimensionals. Depending on placement, the double stack will provide clearance from other design elements.

The cardfront is double matted with Real Red and Granny Apple Green cardstock and embellished with a few gold Metallic Pearls.

Supplies Needed

If you are interested in purchasing any of the above items, please click on the links above or simply click here to visit my online store.

Again, the Sweet Strawberry Bundle is one that I reach for time and time again. Here are just a few of the many projects that I have created using it: A 5×5 Canvas Frame for gift giving, another card, and two 12×12 scrapbook pages.

Until next time, sending you crafting hugs and inspiration wishes!

Lisa

Seascape Bundle

Hello Crafting Hugs Friends! Welcome! To be honest, I have wanted to purchase the Seascape Bundle. And, it trying to decide should I or shouldn’t I purchase it…..I found these wonderful designs with instructions from the wonderful designers at Stampin’ Up.

The Seascape Bundle makes coordination easy and saves you 10% on the stamp and coordinating tool. This bundle includes the Seascape Stamp Set and the Sea Life Dies to help you quickly cut out stamped images for a single project or to create multiples of the same project with ease.

SEASCAPE CLING STAMP SET
Create unique handmade ocean-themed cards using the Seascape Stamp Set. The stamp set features ocean imagery such as seaweed and fishes, as well as sentiments perfect to show family and friends that you care. 

SEA LIFE DIES
Sea lovers or not, you’ll be fond of these dies! Make gorgeous and intricate custom die-cut pieces using the Sea Life Dies and add texture to your handmade cards. The dies include a seahorse, fishes, and seaweed, making it perfect for any type of 

These cards are just gorgeous and easy to recreate with a little stamping, a little die cutting and a little color blending.

For this first card, you create this beautiful tone-on-tone stamped background using Bermuda Bay ink on Bermuda Bay cardstock and second generation inking technique. Essentially, you ink the seaweed stamped image, “stamp off” ink on scratch paper before stamping on the cardstock without reinking the stamp. Second generation technique provides a softer colored stamped image.

For creating the seahorse die cut, use a Blending Brush and Magenta Madness ink to color Basic White cardstock to create your own ombre designer series paper — applying more concentrated color in one area and less color as you brush color away. Die cut the seahorse and apply more color, if desired.

For the coral, use Stampin’ Blends Alcohol Markers to apply light and dark colors at the base or center of each coral branch. Alcohol Markers used are light & dark Mango Melody, Daffodil Delight and Petal Pinker then cut in die machine.

Once you’ve created all the design elements, assemble your card, add a sentiment and a few embellishments and it’s a masterpiece!

For this second card, the die cut elements do all the work! Layer the different colored cardstock in Pool Party, Coastal Cabana and Bermuda Bay to create the 3D illusion of water depth. Use VersaMark ink, White Embossing Powder and your heat tool to create the white coral image on the Bermuda Bay piece. Use ink and second generation stamping technique to create soft, tone-on-tone stamped fish images. Die cut fish and seaweed and attach with Mini Glue Dots and Mini Stampin’ Dimensional. For that true diorama effect, you will need to use lots and lots of Stampin’ Dimensionals and Layering Diorama Dies.

If you are interested in classes to help you take your card making skills to the next level, please private message me. It would be my pleasure to assist you on your paper crafting journey.

Until next time, sending you crafting hugs and inspiration wishes!

Lisa

Hot Dog Fun and Shoebox Swap

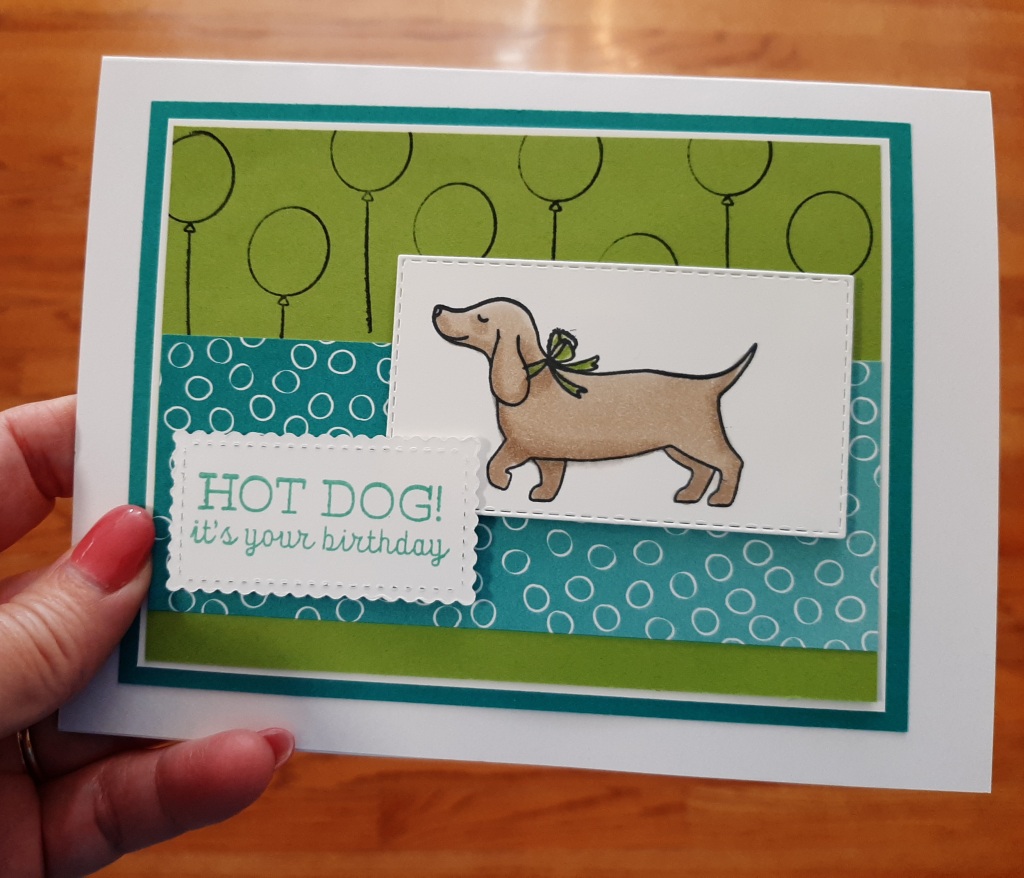
Hello Crafting Hugs Friends! Today’s card was designed by my friend, Ann Sinclair using the Hot Dog Stamp Set. Last Saturday, Ann invited several crafters for a lovely day creating cards, enjoying the beach and sharing a wonderful meal. Each guest brought a shoebox swap filled with creative fun.

What is a shoebox swap?

It is a fun card making event! Every guest designs their own card and them brings all of the card making elements and supplies, packed inside a shoe box for easy transport. Once at the event, each designer explains the necessary steps of their design and then the participants grab a shoebox and start assembling the different projects.  Each card design should take about 10-15 minutes to assemble. It is a lot of fun. It is a good way to learn something new and to be inspired by another designer’s creativity.

  • Shoebox should contain all the elements of the card so participants only have to assemble the card. The elements of your card include: card base, pre-cut/pre-scored card stock and pattern paper, die cuts, ribbons, embellishments, all inks, dry embossed pieces, heat embossed pieces, special adhesives and, of course, stamps on stamp blocks.
  • Providing envelopes is optional, but appreciated.
  • Project should take about 10-15 minutes to complete.
  • Participants bring their own tape runner and scissors to enjoy time creating with friends.

This Hot Dog Stamp Set is just darn cute! I dare you to find a stamp set that has more Dad-joke, dachshund-related puns than the Hot Dog Stamp Set. Pair the adorable doggies with smile-inducing messages to create perfect cards for the dog lovers in your life. Long and short of it, you need this set!

Note: This stamp set is retiring soon (June 30th to be exact). If you’d like to have this darling dachshund stamp set in your collection, please visit my online store soon.

Until next time, sending crafting hugs and inspiration wishes for crafting fun!

Lisa

Friendships Refresh the Soul

Hello Crafting Hugs Friends! One of the best ways to celebrate good times and good people is with the Beauty of Friendship Stamp Set. Using two step stamping technique, you can create the perfect card with a few handstamped trees to celebrate any occasion or to inspire someone.

I just love the imagery of Beauty of Friendship stamp set because trees are essential to life truths about graceful aging, natural beauty, home, community and happiness. Just a walk in the woods will convince you how connected we are to nature. Trees provide us with many benefits to survive, including clean air, access to fresh water, food, shade and shelter. Trees also give us hope and inspiration, and the courage to persevere – even in the harshest conditions. Trees teach us to stay rooted while soaring to great heights. And with a crazy world we live in, a leisurely walk through the trees is all it takes to refresh the soul and to find inspiration.

This is a Two-Step stamp set that allows you to layer two or more images to create one final image with extra texture and dimension in the colors you want, to represent any season – spring, summer, fall or winter. And, it has lovely sentiments for lifting someone’s spirits. The sentiments are mixed of block letters and scripty handwritten font. This stamp set has coordinating dies, Beautiful Trees Dies. While they can be purchased individually, you will save 10% when purchased as Beauty of Friendship Bundle. This was one of my must haves from the new annual catalog.

This card was created using simple stamping — just inks, paper and stamps. Here are the details for this card.

  • Stamp Set: Beauty of Friendship stamp set
  • Cardstock: Very Vanilla, Evening Evergreen
  • Inks: Memento Tuxedo Black, Evening Evergreen, Misty Moonlight, Cajun Craze, Soft Suede
  • Adhesives: Stampin’ Seal
  • Techniques: Simple stamping, Two-Step stamping, Matting stamped image with cardstock.

Until next time, sending crafting hugs and inspiration wishes.

Lisa