Scrapping With Celebrate Sunflowers

Hello Crafting Hugs Friends! I am as passionate about scrapbooking as I am about stamping. And, I love that I can stamp on my scrapbook pages using Stampin’ Up products. I know that everything will coordinate — cardstock, designer series paper, inks and embellishments — and that everything is lignin-free, color-fast and archival quality. One thing I enjoy doing is pre-making my scrapbook pages; so that when I do sit down to scrapbook, I can make a bunch of pages fast!

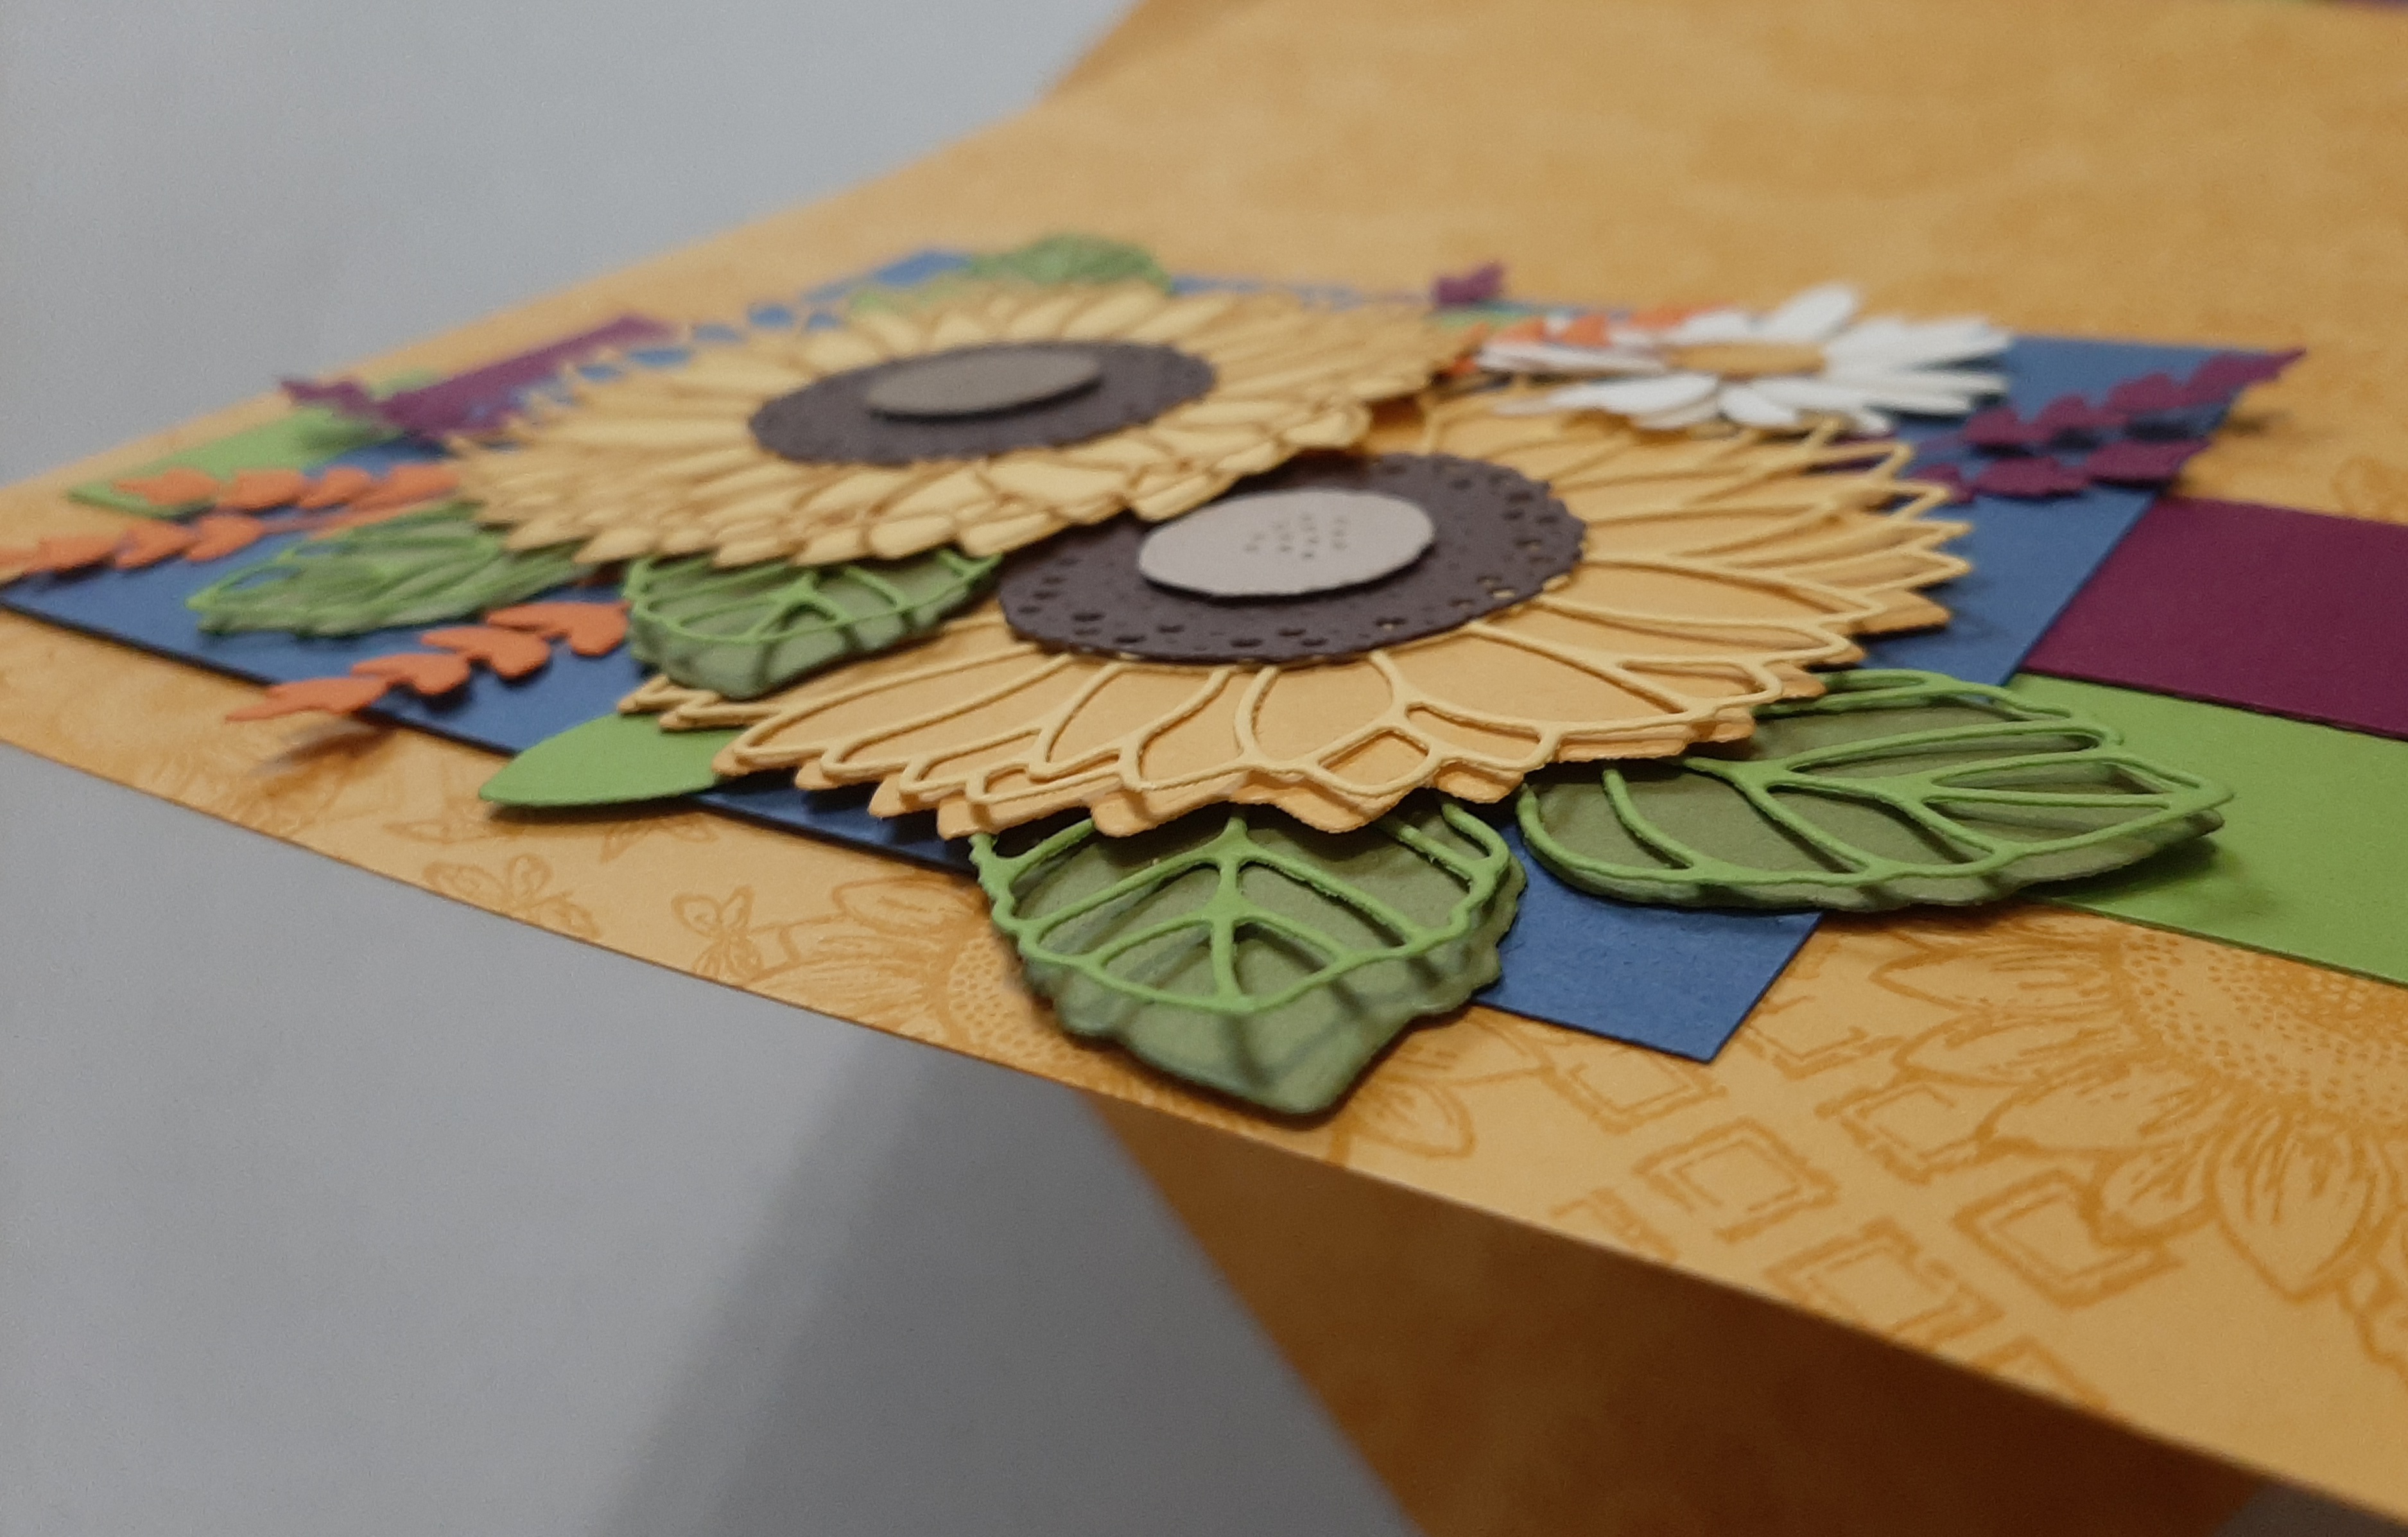
For quite some time, I have enjoyed creating cards using the stunning images and die cuts from the Celebrate Sunflowers stamp set and Sunflower Dies. And, it was refreshing and so much fun to create this two-page scrapbook layout using the custom die-cut sunflowers elements and accents using the Sunflowers Dies that pair perfectly with the Celebrate Sunflowers Stamp Set.

This any occasion 2-page layout uses the winning color combination of: Bumblebee, Daffodil Delight, Granny Apple Green, Old Olive, Misty Moonlight, Pumpkin Pie, Rich Razzleberry, Basic White, Crumbcake, Soft Suede and Early Espresso.

I created my own designer series paper using 12×12 Bumblebee cardstock with tone-on-tone stamping using small sunflower, dragonflies and square tile images from Celebrate Sunflowers, Dragonfly Garden and Tasteful Touches stamp sets.

TIPS AND TRICKS: Randomly stamp images, while rotating your stamp one way and then another. Start stamping with your largest stamped image, then fill in the empty spaces with smaller stamped images. Continue stamping until all the empty spaces are filled.

This two-page spread was so fun to create.

I just grabbed some scraps of cardstock and my Stampin’ Up Cut & Emboss Machine and created a pile of diecuts…..then I started to create. In the end, I added a single white daisy for a little brightness.

TIPS AND TRICKS: Having many different types of adhesives to choose from makes the design process easier for creating wonderful projects! Some adhesives are easier to use in certain situations. For example, Mini Glue Dots provide you with instant dots of adhesive. No fumes, no mess, no drying timework better. And, easy to tuck underneath die cuts for added security. Some adhesives have added benefits. Stampin’ Dimensionals, Mini Stampin’ Dimensionals and Black Stampin Dimensionals are double-sided adhesive foam dots that work great for attaching heavier embellishments, but also add depth and dimension for a 3-D effect to your project.

Supplies Used to create this scrapbook layout:

Please leave me a comment to let me know what you like about this scrapbook layout. And, please share ideas for using your stash of Stampin’ Up products in your scrapbooks.

If you are interested in learning more about scrapbooking with Stampin’ Up products, please private message me and follow my blog for more inspiration.

If you are interested in purchasing any of the featured products, please click here to visit my online store or click on any of the links above.

Until next time, sending you crafting hugs and inspiration wishes for using your Stampin’ Up supplies to create unique scrapbook pages!

Lisa

Card Making Using Dies

Hello Crafting Hugs Friends! Welcome! Thank you for stopping by!

Here is a card that I received from another Stampin’ UP Demonstrator and Friend, Michelle Brown, who created this darling forest scene using the Iconic Dies and Basic Border Dies. Can you image the little creatures that live there? Maybe a fairy or gnome? Or tiny turtle?

It is so easy to create your own fairytale forest scene with the Iconic Dies! These dies are very versatile can be combined with other stamped images and die cuts to make one-of-a-kind scene. Try layering the die cuts in natural tones and other stamped images, and you’ll have a masterpiece! There are so many options with these Iconic Dies!

Dies help you create unique die-cut shapes and paper cut outs with just a quick run through your Stampin’ Cut & Emboss Machine. And, die cuts can easily be colored with a few swipes of Blending Brushes for a natural color look.

If you are interested in any of these products, simply click on the links provided or click here to visit my online store.

Until next time, sending you crafting hugs and inspiration wishes for creating your own fairytale masterpieces.

Lisa

A Sweet Card or maybe something else?

Hello Crafting Hugs Friends! The other day, I was playing in the craft room with Beautiful Tree Dies and created this simple card — two red birds sitting in a tree.

Funny story. Right before I stamped the sentiment from Beauty of Friendship stamp set, my husband walks in, looks over my shoulder and starts singing that playground chant/taunt from elementary school. You know the one…..

“Lisa” and “Richie” sittin’ in a tree
K-I-S-S-I-N-G
First comes love, then comes marriage
then comes ….

So according to my husband’s warped brain, this could be a cute engagement card or a welcome baby card — that is, with a different sentiment. LOL! Well, what do you think???

  • Bundle: Beauty of Friendship Bundle (save 10% when purchasing stamp and dies together)
  • Cardstock: Pear Pizzazz, Real Red, Soft Suede and Very Vanilla
  • Ink: Real Red ink pad, Basic Black Stampin’ Write Marker
  • Tools: Stampin’ Cut & Emboss Machine
  • Adhesives: Adhesive Sheets, Stampin’ Seal, Mini Glue Dots

Please leave a comment and let me know what you think. Is this a sweet card for inspiration? Or, should I have changed the sentiment to make it something else????

Until next time, sending crafting hugs and inspiration wishes!

Lisa

Graduation Card using Sailing Home

Hello Crafting Hugs Friends! The beautiful line art imagery and sentiments from Sailing Home stamp set is the perfect choice to help you on your creative journey. The simple “Congrats” and the scripty “Set Sail in The Direction of Your Dreams” sentiments are perfect for graduation card, farewell card and even a retirement card.

Second Generation stamping inside the card using compass image adds the finishing touch.

Thank you for stopping by today. Stay tuned for another blog post using Sailing Home Stamp Set for creating terrific scrapbook pages.

Until next time, sending you crafting hugs and inspiration wishes!

Lisa

Scrapbooking on the Seashore

Hello Crafting Hugs Friends! Today, I have a wonderful 12×12 two-page layout featuring the Friends are Like Seashells Bundle. I created this layout for April’s scrapbook class because those seashell, sand dollar, starfish, and sea grass images are the perfect accompaniment for sea-themed scrapbook pages.

I love creating scrapbook pages with current and retired products from Stampin’ Up! Everything is designed to coordinate — the colors, the imagery and the design. It really helps to take the guess work out of crafting and to bring color, creativity and imagination to every design. And, I love, love, love getting more value from my purchases when I can mix and match to make something fabulous!

For this layout, I used two pieces of 12×12 Night of Navy cardstock. To embellish the opposite corners, I cut 8.5″x11″ cardstock in half using my Paper Trimmer to create two 8.5″x5.5″ pieces of Crumb Cake and two pieces of Seaside Spray (recently retired) in order to showcase the seashell collages.

The seashell collages were created using the largest background die from Seaside Seashell Dies (part of Friends are Like Seashells Bundle) and embossed them using the Seashells 3D Embossing Folder. I diecut and embossed two: one in Very Vanilla and the other in Seaside Spray (recently retired).

Next, I stamped the seashell images only on the embossed Very Vanilla die cut, and used a Blender Pen to softly color the seashells with the ink from the stamped image. Each seashell image was fussy cut with paper snips, closely following the outline image. As I cut the Very Vanilla background die apart, I saved the extra pieces of Very Vanilla seaweed to use later in creating the collage.

Next, I cut the Seaside Spray diecut in half, attaching the stamped Very Vanilla seashells with Multipurpose Liquid Glue. Using scraps of Very Vanilla cardstock, I stamped and fussy cut the starfish, the sand dollar, and the seahorse (from Seaside Notions stamp set) in Night of Navy ink and used a Blender Pen to softly color. Note: I added character to the starfish and sand dollar by using 2nd and 3rd generation stamping technique with the “blob” stamp.

This two page scrapbook layout was a lot of fun to create! And, it is pre-made and ready to go once I print my photographs.

Please leave a comment and share how you use Stampin’ Up products in your scrapbooks.

Until next time, sending crafting hugs and inspiration wishes!

Lisa

Soar Confidently

Hello Crafting Hugs Friends! I love beautiful line art and the sky is the limit when it comes to creating cards for all the men in your life! The Soar Confidently Stamp Set has wonderful images of hot air balloons, blimps and old-timey airplanes plus great sentiments for Father’s Day, encouragement, congratulations–to create handsome masculine cards or to document bucket list adventures on scrapbook pages.

Any time a new catalog is released, I always look to purchase masculine stamp sets. And, Soar Confidently Stamp Set is definitely a stamp set that I will keep.

For this card, I first stamped the hot air balloon on Crumb Cake cardstock using Misty Moonlight ink and then fussy cut it out using my Paper Snips. To create the background piece, I use the *new* Blender Brushes to swirl Misty Moonlight ink on Very Vanilla cardstock diagonally across the piece. The compass images from Sailing Home Stamp Set were stamped in Soft Suede ink. I actually used two sets of seagull images — from Sailing Home Stamp Set and High Tide Stamp Set, which were stamped in Misty Moonlight ink. The sentiment from Soar Confidently Stamp Set was stamped in Misty Moonlight ink in the lower left corner. Next, I embossed the stamped background piece using Old World Paper 3D Embossing Folder using my Stampin’ Cut & Emboss Machine. The embossed piece was matted with cardstock before attaching it to a card base using Multipurpose Liquid Glue to ensure a strong adhesive bond. The hot air balloon image is popped up with Stampin’ Dimensionals.

Did you notice the knot? It is one of my favorites and works well for masculine cards. To create the bow, I cut a 5″ piece of Misty Moonlight Twill Ribbon and put a tiny strip of Stampin’ Seal adhesive in the center. Next, I wrapped Night of Navy Baker’s Twine from Well Suited Twine Combo Pack around three fingers, keeping the tails long. Place the baker’s twine on the tiny strip of adhesive before tying a half square knot using the twill ribbon. The Stampin’ Seal adhesive helps to hold the knot. This knot adds lots of texture to the overall card design yet it lies fairly flat. A Mini Glue Dot is all that is necessary to attach it to the card.

Until next time, sending you crafting hugs and inspiration wishes for creating fabulous masculine cards!

Lisa

Introducing the NEW Stampin’ Cut & Emboss Machine

prized peony with ornate label dies and seaside notions sentiment

Hello Crafting Hugs Friends.  Here is the first card I made with my NEW Stampin’ Cut & Emboss Machine using Prized Peony Stamps, Peony Dies and very detailed Ornate Layers Dies.

Stampin' Cut & Emboss Machine open

As a demonstrator, I was able to pre-order our NEW Stampin’ Cut & Emboss Machine on August 4th.  I was so excited that I paid two-day shipping rates to receive in on August 6th.  Since then, I have been enjoying creating with it.  This is a must-have tool.  It is the workhorse in my craft room.  Long ago, I dropped my old Big Shot Machine on the driveway and broke it.  I cried, and cried again when my hubby couldn’t fix it.  After three weeks, I had to get another Big Shot.  I did not realize how much I used it.  I guess I took it for granted.  It seemed like I really could not create my card designs without embossing or die cutting.

Time to welcome the NEW Stampin’ Cut & Emboss Machine and to say farewell to the Big Shot forever. 

Stampin' Cut & Emboss Machine with Big Shot

First, this NEW machine is just beautiful.  The main body reminds me of our Shimmer White cardstock with Basic Gray, Brushed Silver and Shiny Silver Accents.  I guess you have to be a card maker to fully appreciate its beauty! LOL!!!

Stampin' Cut & Emboss Machine open

Just look at this beauty! You can order it on September 1st. 

Or, if you want it NOW and to Save $40, join my Crafting Hugs Team.

Second, this NEW Machine out performed my trusty Big Shot.  The dies rolled smoothly through the machine and cut cleanly the first time through when using the very detailed Ornate Layers Dies.  With my Big Shot, I had to add paper shims and run the dies back and forth several times to get a clean cut.  When stored, it takes up less space

Stampin' Cut & Emboss Machine with Big Shot from above

Third, this NEW Machine is easy to use.  The numbered plates make it easy to create the perfect sandwich for die cutting and embossing.  To cut with our Thin Dies, start with placing Plate #1 on the machine’s platform, followed by Plate #2, then add Cutting Plate #3.  Now placing your cardstock, the die and finally the second Cutting Plate #3.  Turn the handle and watch the sandwich come out the other side.  It is magical! It is super easy to get fantastic results!  And, it’s addictive!  Once you start embossing and die cutting for your paper crafting projects, you will truly wonder how you ever lived without it!

Stampin' Cut & Emboss Machine numbered plates

Fourth, this NEW Machine has the perfect price point.  At $120, it comes with all the plates you need to emboss and die cut.  PLUS, you can save about $40 when you join my Crafting Hugs Team.  Simply purchase the Starter Kit for $99, you select $125 in PRODUCTS OF YOUR CHOICE with FREE SHIPPING.  Select the PRODUCTS OF YOUR CHOICE to be the NEW Stampin’ Cut & Emboss Machine plus a little something extra – such as dimensionals, pearls or rhinestones so that you get as close to the $125 value (but not over) as possible. 

As a demonstrator, you will save at least 20% on all future purchases – making your money for craft supplies stretch further There is no obligation to teach classes or sell products.  To renew your demonstrator benefits, you will need $300 in sales per quarter.  Stop hoarding Michael’s and Hobby Lobbby coupons and stop being frustrated when those purchases do not coordinate.  Join the Stampin’ Up family and enjoy crafting with coordinating products – cardstock, designer series paper, embellishments and ribbons.  You will love the savings and the inspiration that comes from using Stampin’ Up products – the world’s leader in paper crafting coordination!  It is the best decision that I ever made

Click here to join and to get your $99 Starter Kit today!

Until next time, sending you crafting hugs and inspiration wishes!

Lisa